Jupyter notebook을 그냥 Local PC에서 사용하면 이렇게 수고할 필요는 없지만 사양이 좋은 PC에서 계산을 하고 그걸 원격으로 다루기 위해서는 Jupyter notebook을 원격으로 접속할 필요가 있다. 이렇게 하면 굉장히 좋은게 가벼운 노트북을 가지고 어디서나 고사양의 PC를 이용해 원하는 계산을 바로바로 할 수 있게 된다. 이를 위해서는 ssh를 이용해서 쉽게 하거나 putty를 이용하는 방법이 있다.(사실 둘이 거의 비슷하다, 여기에서는 jupyter notebook server를 ubuntu에 설치하는 것을 가정하고 하고 있다)
기본적인 jupyter notebook setting
가장 필요한 건 당연히 remote PC에 jupyter notebook을 설치하는 것이다. 먼저 .jupyter를 만들고 password를 setting해준다.
jupyter notebook --generate-config
# Password setting
jupyter notebook password
이후에, .jupyter폴더 내에 있는 jupyter_notebook_config.py 파일을 수정해서 기본적인 option을 setting할 수 있다.
# Set ip to '*' to bind on all interfaces (ips) for the public server
c.NotebookApp.ip = '*'
c.NotebookApp.open_browser = False
# Set port to access jupyter notebook
c.NotebookApp.port = 9999
여기까지 하면 기본적인 setting은 끝나게 된다. 추가적으로 encrpyted communication을 원한다면 이곳에서 확인할 수 있다.
위의 경우는 jupyter notebook server setting에 대한 것으로 오직 한 user만 사용가능하다. 만약 여러 user가 사용가능한 server를 만들고 싶다면 jupyter notebook herb를 사용해야 한다.
SSH
- remote PC에서 jupyter notebook을 킨다
# 따로 option setting을 사전에 안 한 경우
jupyter notebook --no-browser --port=8889
# option setting을 미리 한 경우
jupyter notebook
- 우리의 local PC에서 MS-DOS cmd나 terminal에서 다음과 같이 입력한다
ssh -N -f -L localhost:8888:localhost:8889 username@your_remote_host_name
# 여기서 해당하는 username, remote host name을 대신 입력해주면 된다.
- Web browser에서
localhost:8888를 입력하자- 위와 같이 입력해주게 되면, port forwarding이 되는 것으로 우리의 local PC에서
localhost:8888를 입력하면 remote PC의localhost:8889또는 8889 port로 이동하게 되는 것이다.
- 위와 같이 입력해주게 되면, port forwarding이 되는 것으로 우리의 local PC에서
Putty
- remote PC에서 jupyter notebook을 킨다
# 따로 option setting을 사전에 안 한 경우
jupyter notebook --no-browser --port=8889
# option setting을 미리 한 경우
jupyter notebook
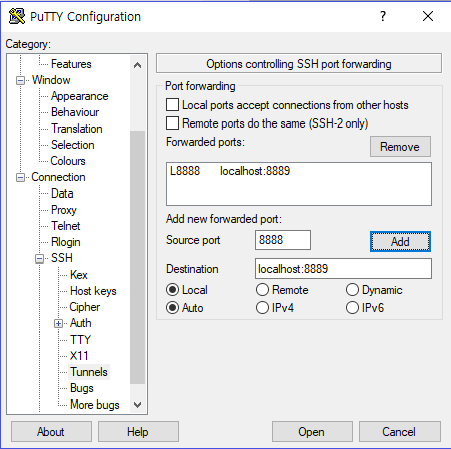
- putty를 새로 키고
connection->SSH->Tunnels로 들어간다.
- 위와 같이
source에는 local PC에서 접속할 port 예를 들면, localhost:8888로 접속할 것이라면 8888을 입력한다.destination에는 remote PC의 localhost:jupyter notebook port를 입력한다. 이렇게 옆의Add버튼을 누른 후 기존의 방식처럼 접속하면 된다. - Web browser에서
localhost:8888를 입력하자