이 Post는 Google I/O 2018에서 Colab을 이용한 간단한 neural network를 만드는 것을 보고 정리겸 만든 것이다. 간단하게 하나의 Neural network를 만들어내는 과정은 Keras의 강력한 모습을 보여주는 것 같다. MNIST를 이용한 Hand writing(0~9까지의 숫자) 인식 network는 보통 머신러닝에서 Hello world처럼 여겨지는 것으로 모델을 간단히 시험해보기에는 최적의 대상이라고 생각된다. 아래의 코드를 이용하면 굉장히 간단하게 직접 NN을 만들어낼 수 있다. 구조는 크게 다음과 같이 나눌 수 있다.
- Get dataset
- Reformatting the data and label
- Build the model
- Train
- Evaluate
- Predict
import tensorflow as tf
import numpy as np
import matplotlib.pyplot as plt
Step 1 : Download the dataset
(train_images, train_labels), (test_images, test_labels) = tf.keras.datasets.mnist.load_data()
Step 2 : Reformat the images
MNIST data는 기본적으로 num_images x 28 x 28이므로 3차원의 data이다. 여기서 이미지 하나하나의 dimension은 28 x 28로 눈으로 확인할 때에는 2차원으로 보는 것이 좋지만 processing을 할 때에는 784 = 28 x 28로 flatten을 하는 것이 좋다. 즉, 실제로 neural network의 input data shape은 num_images x 784가 된다.
또한, 0부터 255까지의 pixel 범위를 그대로 사용하는 것이 아니라 0부터 1사이로 conversion을 해줌으로써 training이 더 잘되게 해줄 수 있다.(Scaling to unit length)
TRAINING_SIZE = len(train_images)
TEST_SIZE = len(test_images)

# Flatten the dataset
train_images = train_images.reshape(TRAINING_SIZE, -1).astype(np.float32)
test_images = test_images.reshape(TEST_SIZE, -1).astype(np.float32)

# Convert pixel value from integers between 0 and 255 to floats between 0 and 1
train_images /= 255
test_images /= 255
Step 3 : Reformat the labels
MNIST의 data label은 0부터 9까지의 숫자를 그대로 나타내지만 network에서는 multi class에 대한 training을 위해 이를 one hot encoding으로 바꿔주어야 한다. one hot encoding은 keras.utils에 to_categorical이라는 함수로 주어지기 때문에 기존의 label data를 간편하게 바꿔줄 수 있다.
- one hot encoding이란 기존의 label이 3이었다면 이를 [0,0,0,1,0,0,0,0,0,0]로 index로 값을 표현하는 것을 의미한다.
NUM_DIGITS = 10
print('Before', train_labels[0])
train_labels = tf.keras.utils.to_categorical(train_labels, NUM_DIGITS)
print('After', train_labels[0])
test_labels = tf.keras.utils.to_categorical(test_labels, NUM_DIGITS)
Step 4 : Build the model
여기에서는 하나의 hidden layer만을 가지고 있는 single layer network를 사용할 것이다. hidden layer의 activation은 ReLu, output layer는 softmax를 사용할 것이다. Keras를 이용하면 다음과 같이 network에 layer를 하나씩 추가하는 구조를 통해 굉장히 간단히 network를 구현할 수 있다.
model = tf.keras.Sequential()
model.add(tf.keras.layers.Dense(512, activation=tf.nn.relu, input_shape=(784,)))
model.add(tf.keras.layers.Dense(10, activation=tf.nn.softmax))
Model을 train하기 전에 loss와 optimizer를 정하는 model.compile과정이 필요하며 model.summary()를 통해 model의 구조를 한눈에 파악할 수 있다.
model.compile(loss='categorical_crossentropy', optimizer='rmsprop', metrics=['accuracy'])
model.summary()
Step 5 : Training
train data를 이용해 training을 한다.
model.fit(train_images, train_labels, epochs=5)Step 6 : Evaluate
test data를 통해 evaluation of model을 하는데, 위의 과정을 거쳤다면 0.98의 accuracy를 얻을 수 있다.
loss, accuracy = model.evaluate(test_images, test_labels)
보이는 것처럼 Keras를 이용한 network 구현은 굉장히 간단하게 할 수 있다. 역시 머신러닝에서 중요한 건 구현을 잘하는 것 보다 문제를 어떤 방식으로 접근할지, 어떻게 Data를 구할지인것 같다.
Question
간단한 Network를 구성하면서 문득 든 생각은 hidden layer의 unit 수와 accuracy의 상관관계였다. unit의 숫자가 많아질 수록 정확성이 올라가겠지만 fitting하는 parameter 숫자가 그만큼 많아지는 것이기에 한번 unit의 숫자를 바궈가며 accuracy를 측정해보았다.
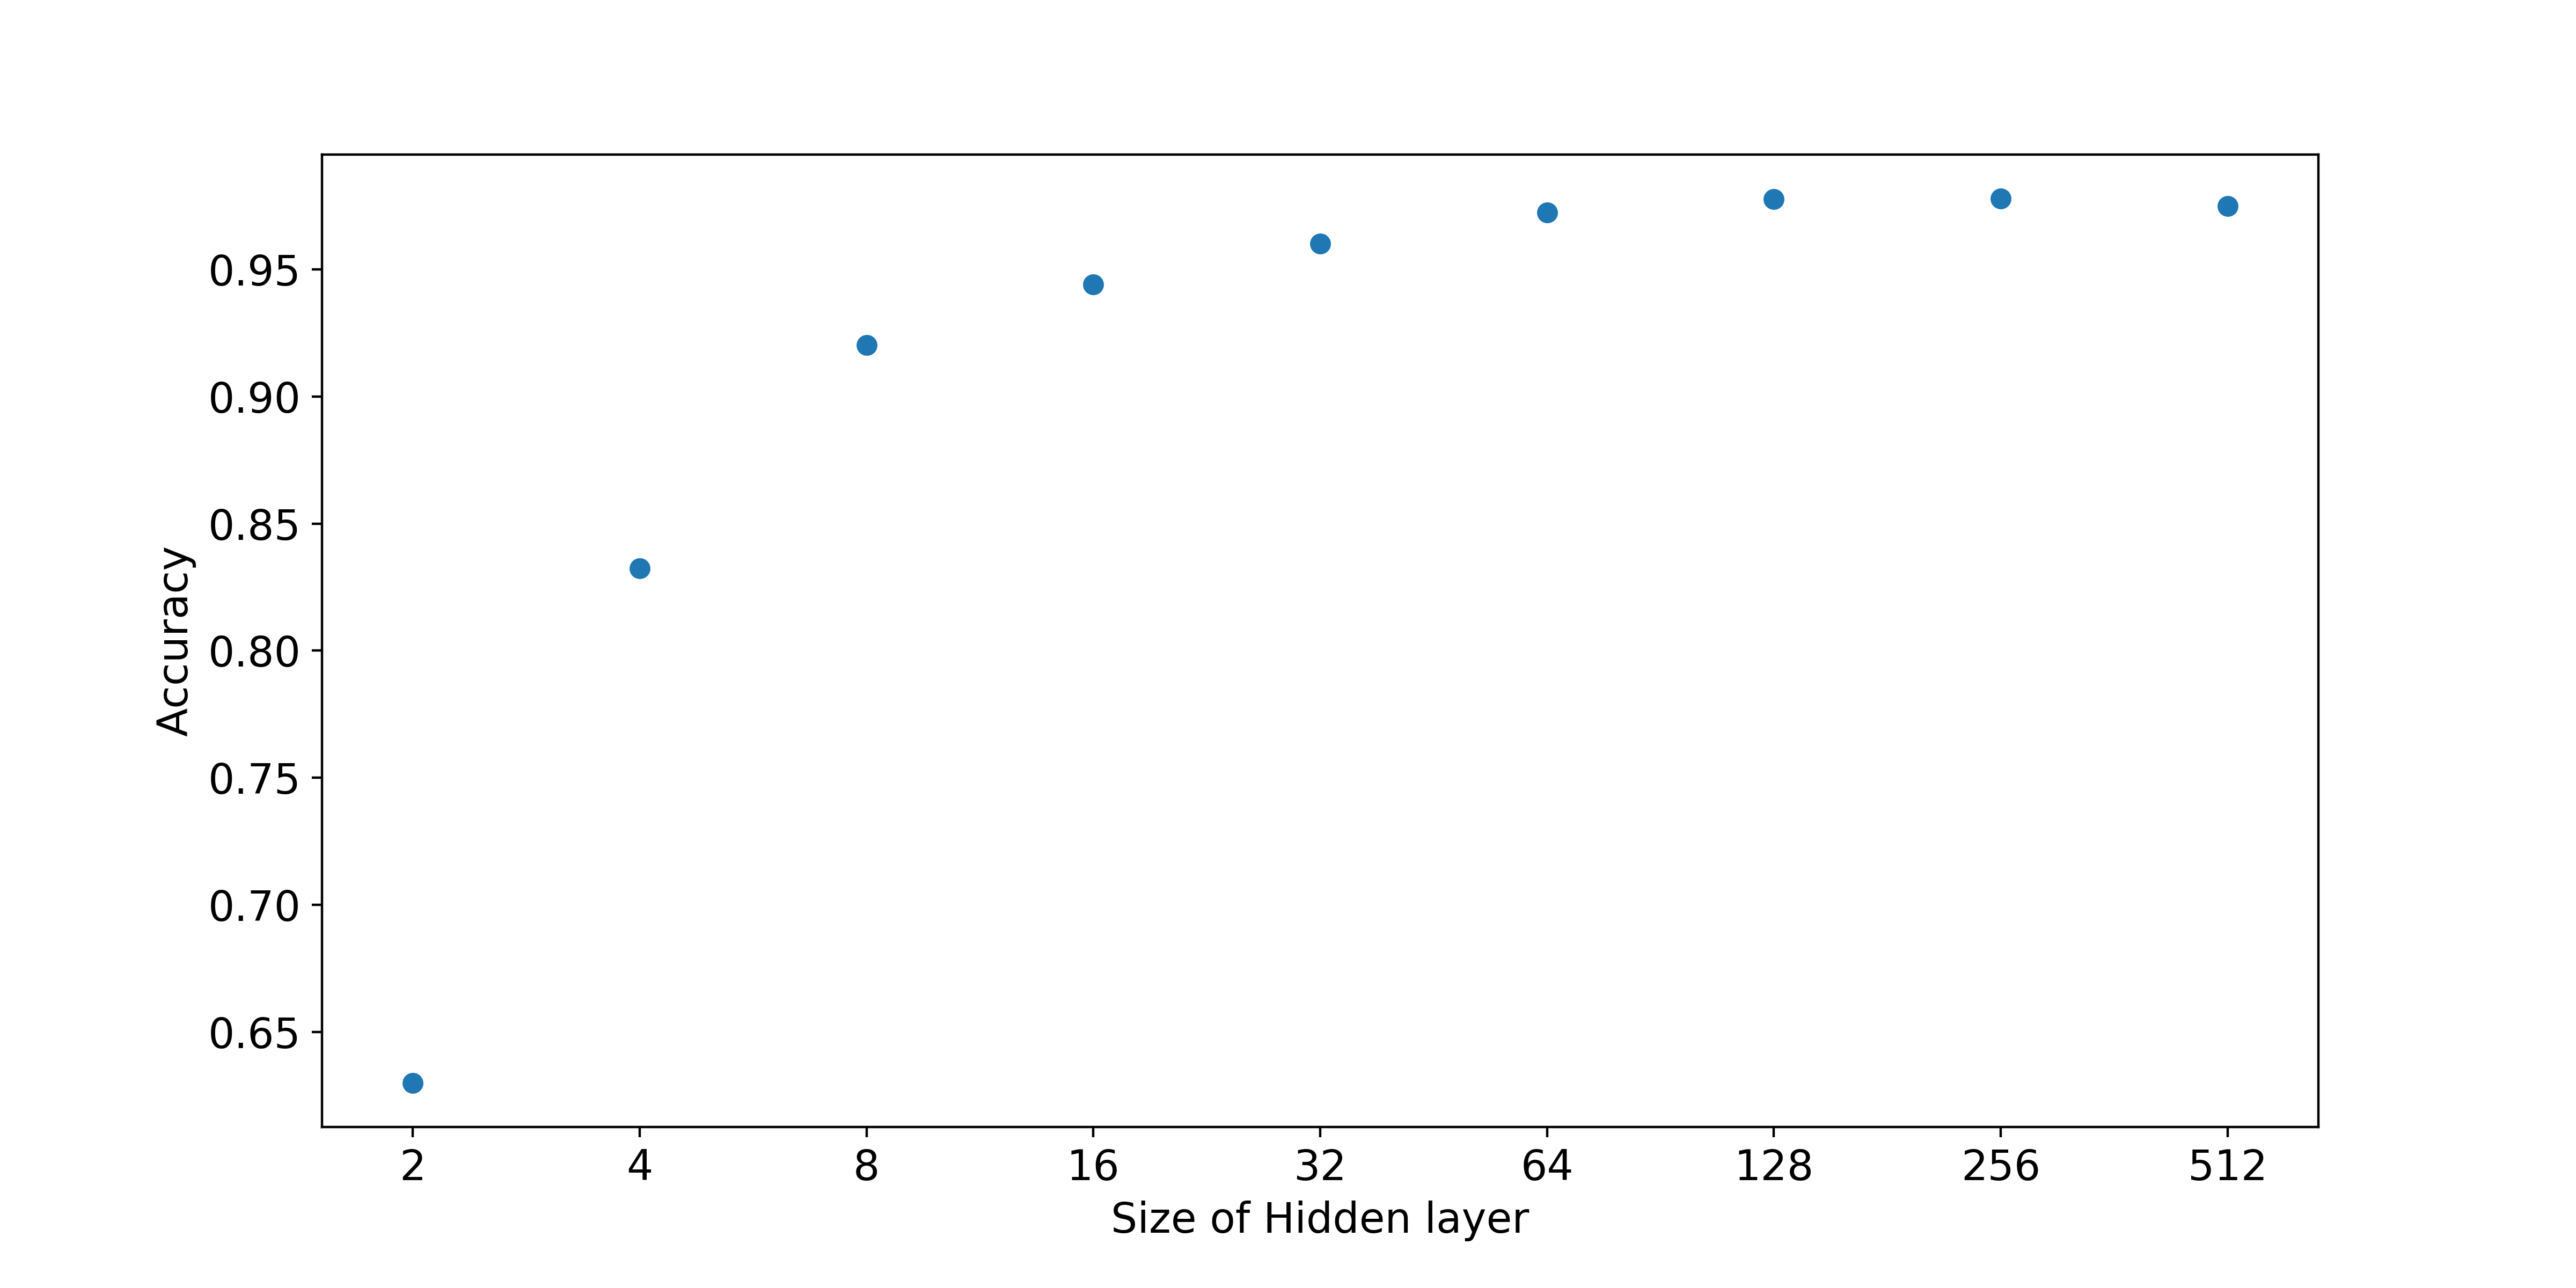
그 결과 위와 같은 그래프를 얻을 수 있는데, 문제 자체가 간단했기 때문이겠지만 layer의 unit 숫자가 8개만 되어도 0.9 이상의 accuracy를 확인할 수 있었다. 물론 이렇게 간단한 data가 아니라 실제 생활의 data라면 더 많은 unit의 숫자가 필요하겠지만 그때그때 위와 같은 과정을 통해 적당한 값을 찾는 게 중요한 것 같다.
Ref
- Google I/O 2018(https://events.google.com/io/recap/)